Frequently Asked Questions
Initial Activation of System
i) Do you have a broadband connection from your Internet provider?
This could be a DSL or cable internet provider. There is no support of dial up services.
ii) Do you have a working Wi-Fi router in your home with an available LAN port?
The router allows the distribution of the broadband signal to other devices in your home. It supports both physical connection and wireless to these devices. Our system will require a physical connection to one of the available LAN ports on the router.
iii) Do you have a working smartphone with data plan?
Your smartphone will be needed to install and access our security control app, and for support of SMS messaging, streaming video, and email.
iv) Do you have power outlets located where you are placing the cameras and Shuttle?
This, primarily, eases the installation by having these devices near AC outlets. In addition, it would be ideal to have the Shuttle also near your home router, since there is a required physical connection to a LAN port.
Please follow the step by step instructions of our installation guide and you should have no problems with our security system coming on-line successfully.
Please call Spectrum to open the following four ports for your service: 80.443.53.123.
User Account & Credential Security Management
Tap “Forgot password?”
You will be prompted to provide the Account Number (phone number)
Tap “Submit”
The following message will appear, “Request submitted. An email with a new password will be sent to you shortly”. A new password will be emailed to the email address that is associated with your account.
You can then change the randomly generated password by:
From the home screen, tap the “Sidebar Menu” icon
Tap “My Profile”
Tap “Change Password”. Enter the randomly generated password, type in the new password, retype new password
Tap “√” (Save)
All Home8 accounts start with a country code. For example, if you have a United States phone number, please be sure to add a 1 in front of your phone number.
All activated Home8 systems belong to one account owner. To change the account owner of a system, the original system owner must remove that system from his/her Home8 account, and then add the system under the new Home8 account. Follow the step-by-step instructions below.
[Remove System]
Login to the old Home8 account:
Tap on the Sidebar Menu button and select “Device Management”.
Tap on the Name of the System
Scroll down to the bottom of the page to [Remove OPU/Shuttle]
[Add System]
Login to the new Home8 account:
Tap on the Sidebar Menu button and select “Add Device”.
Locate the QR code on the Home8 OPU/Shuttle, tap [Scan QR-Code] then scan the QR code on the Home8 OPU/Shuttle.
Set Location: name your new system/gateway location in the box field, and follow the setup instructions.
Please note that the process of removing an OPU/Shuttle from a Home8 account will erase all the settings and data such as recorded event videos under that OPU/Shuttle. If you wish to keep the event videos, we suggest backing up the videos by sharing them to your selected destination or if the system is subscribed to premium service, sync your Home8 account to your Dropbox account by going to the [Dropbox] icon in the Sidebar Menu.
Only the system owner, which is the account used to activate the system, can authorize additional users to access the system. To authorize a user to a system, from the owner’s Home8 app login:
Go to Sidebar Menu -> User Management -> Authorized User
Tap on the (Add) button.
Input the first name and last name of the Authorized User, the assigned country code of the phone number, and the Authorized User’s phone number.
Tap on the (Save) button to confirm the new addition or (Back) to go to the previous screen.
To add additional Authorized Users, please repeat the steps.
The server will send out a notice to the new Authorized User to accept the user invite.
Note: the authorized user must also download a Home8 app and set up an account using the phone number authorized.
To reset your PIN code for Google Assitant and Google Home:
1) Unlink your Home8 account from Google Assitant by following this instruction: https://support.google.com/googlenest/answer/7126338
2) Link your Home8 account by following this instruction: https://www.home8alarm.com/google-assistant-home8/
3) Write down your PIN code and keep it in a safe place for future verification!
Device Management
You can protect as many locations and loved ones as you would like. The protection service is location-based.
To add additional systems to your existing account:
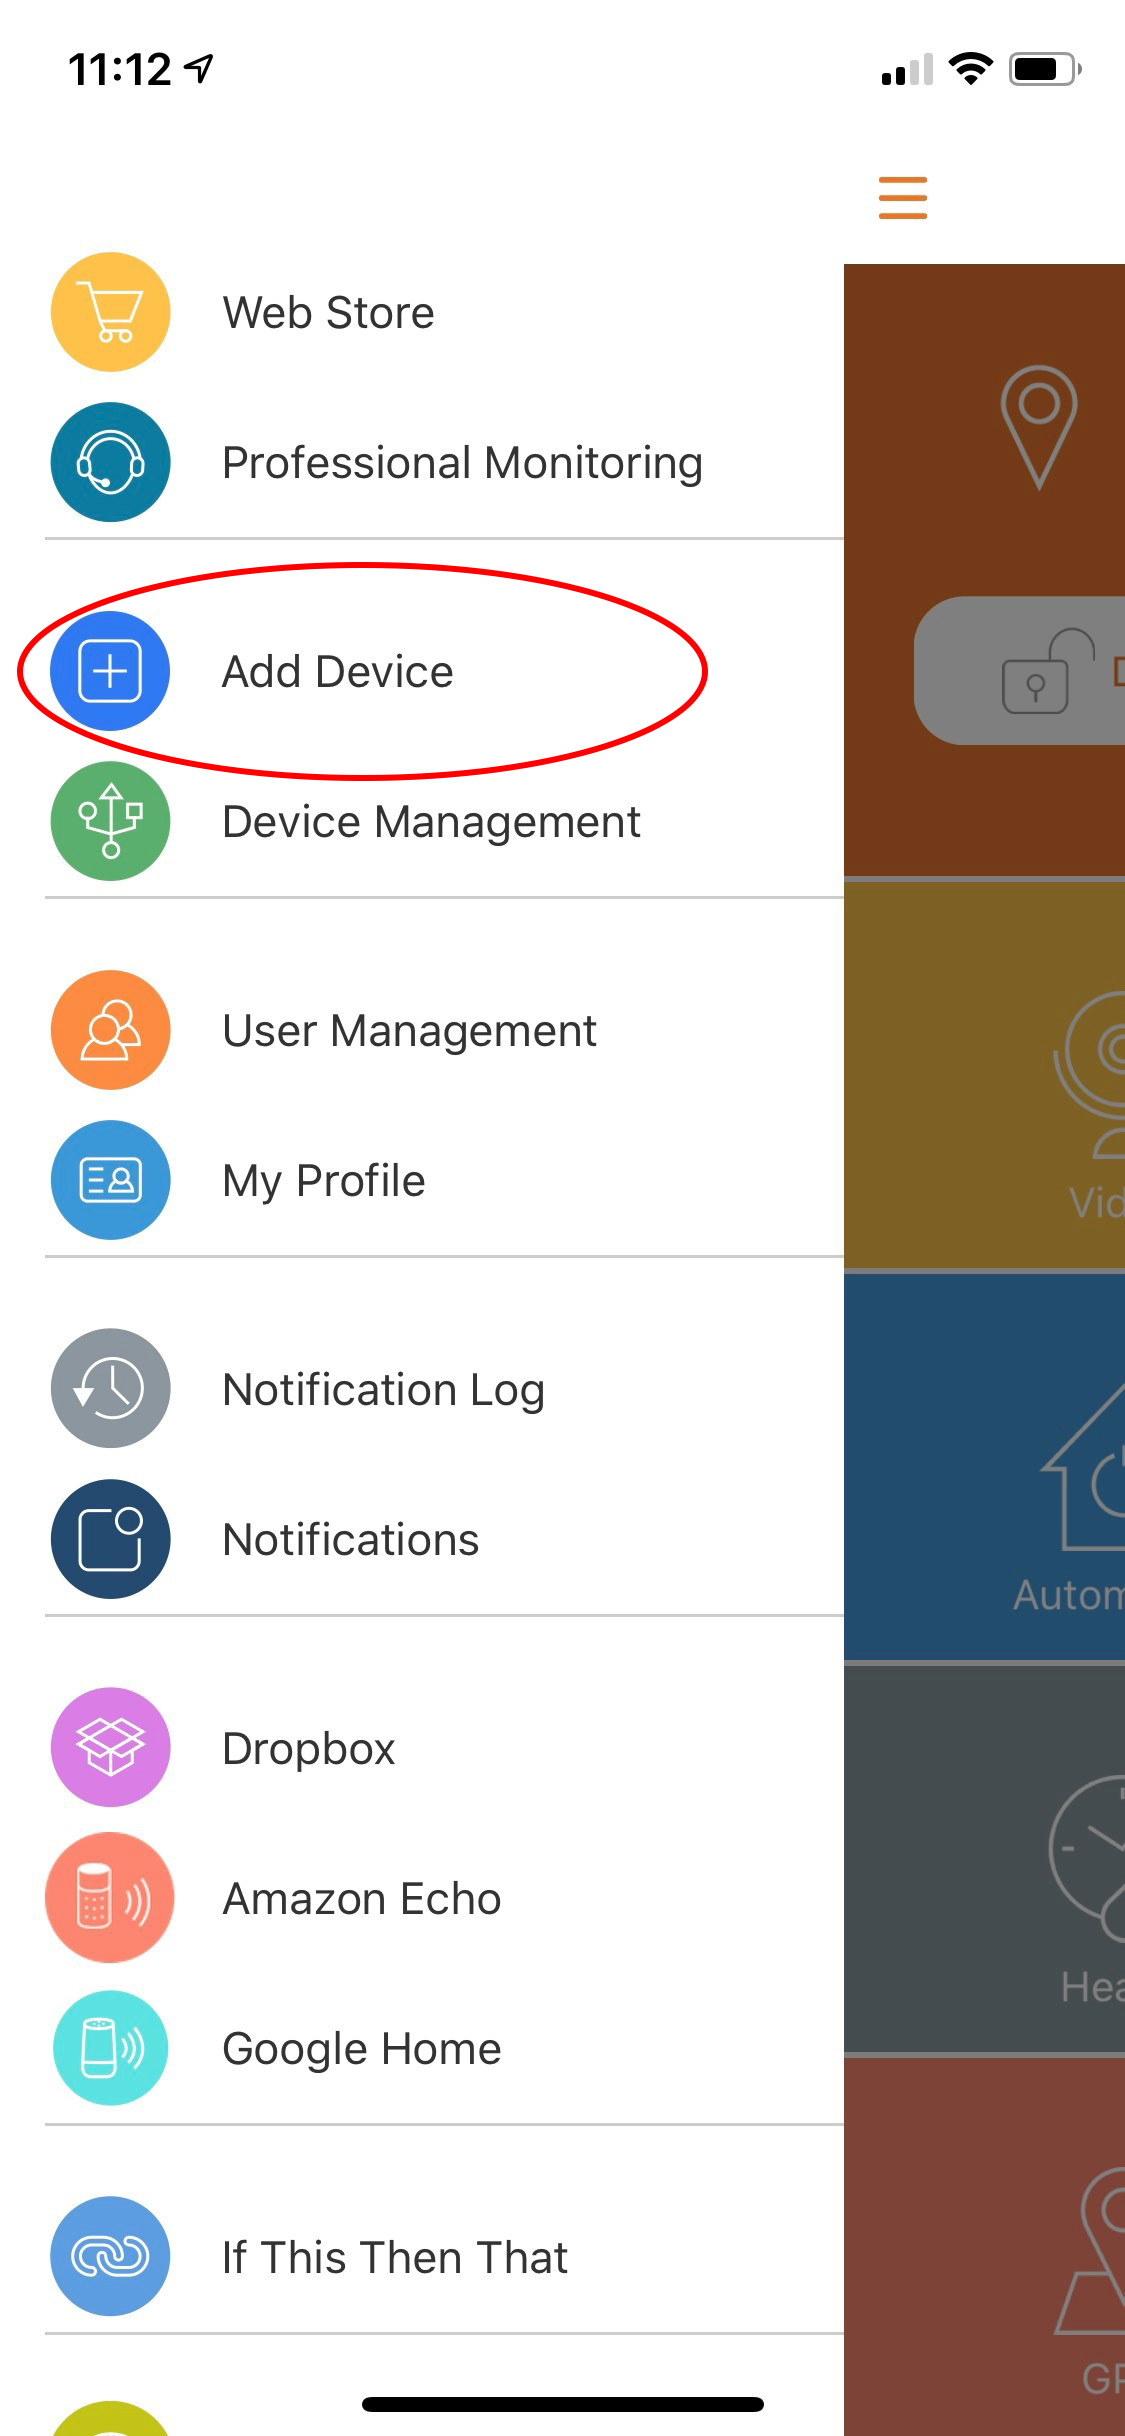
From the home screen, tap the “Sidebar Menu” icon
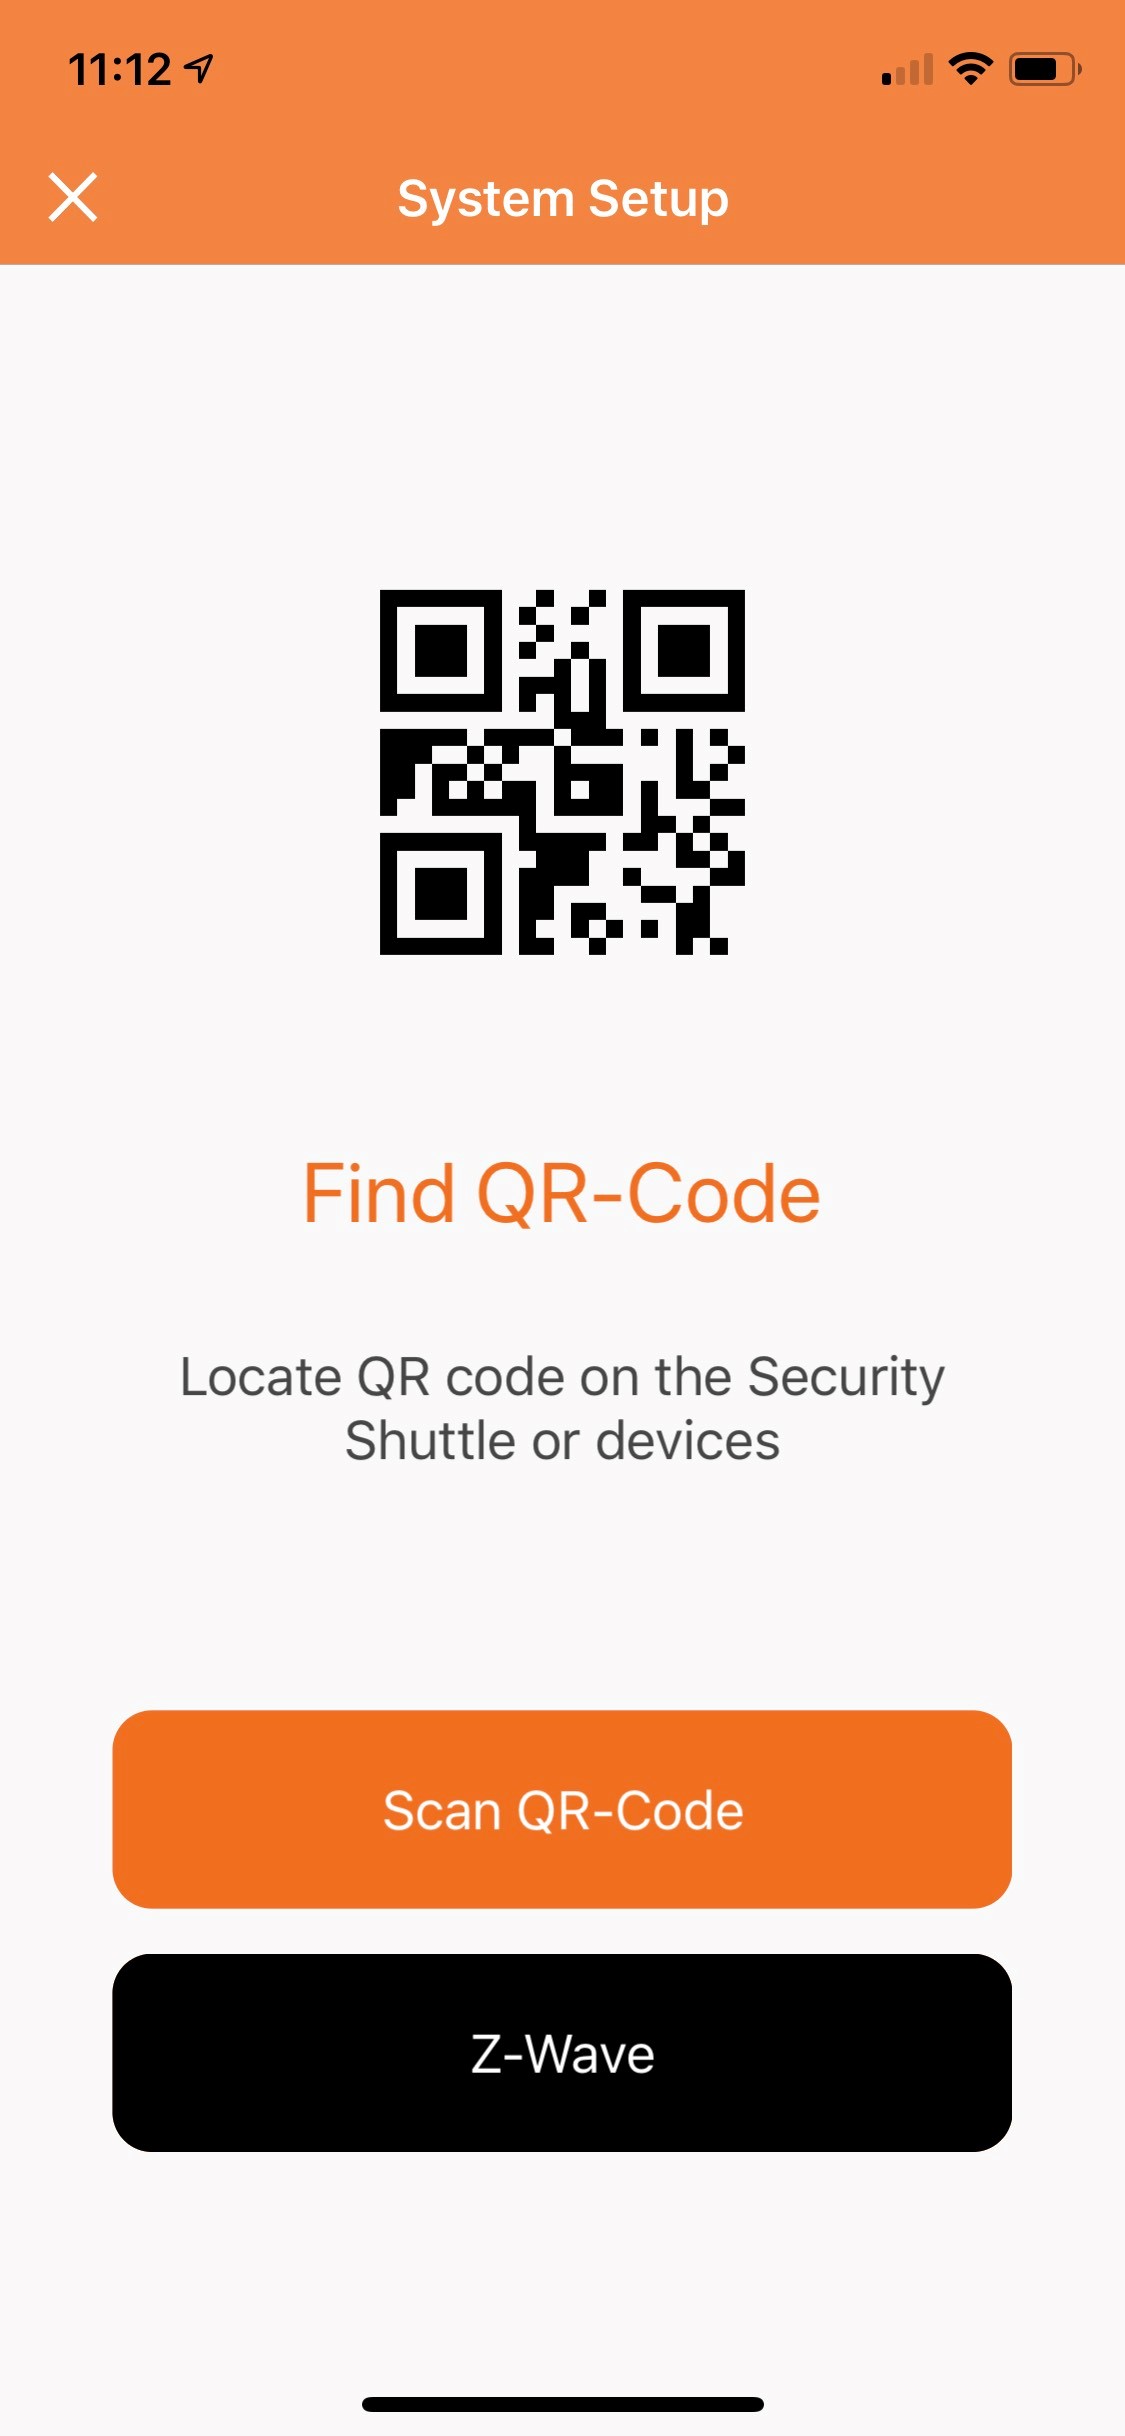
a) Tap “Add Device”
b) Scan the QR code.
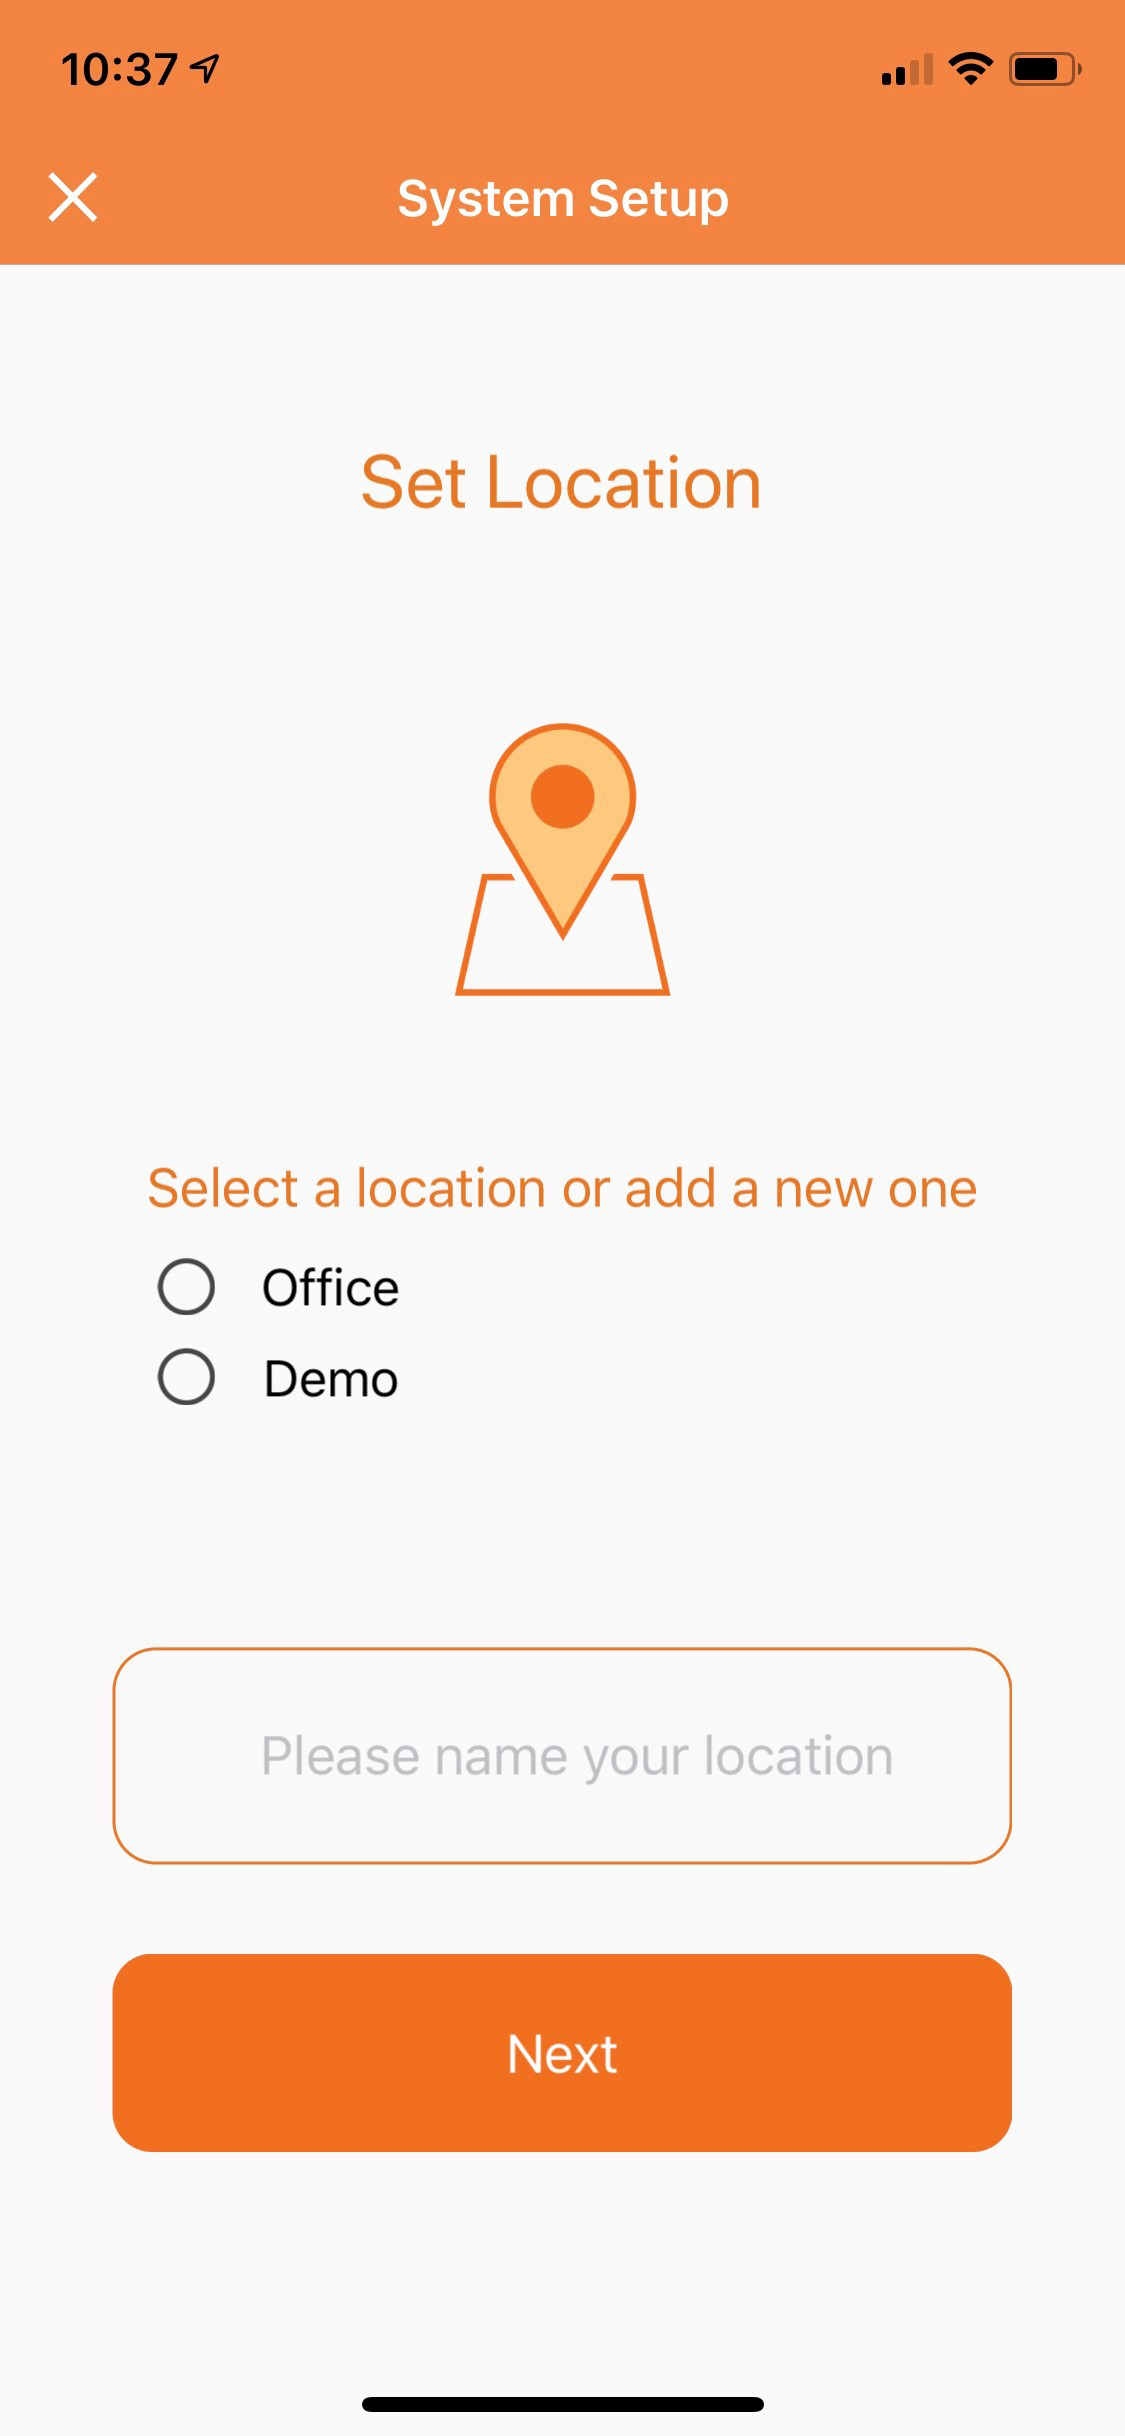
c) Name your new system/gateway location, and follow the setup instructions.

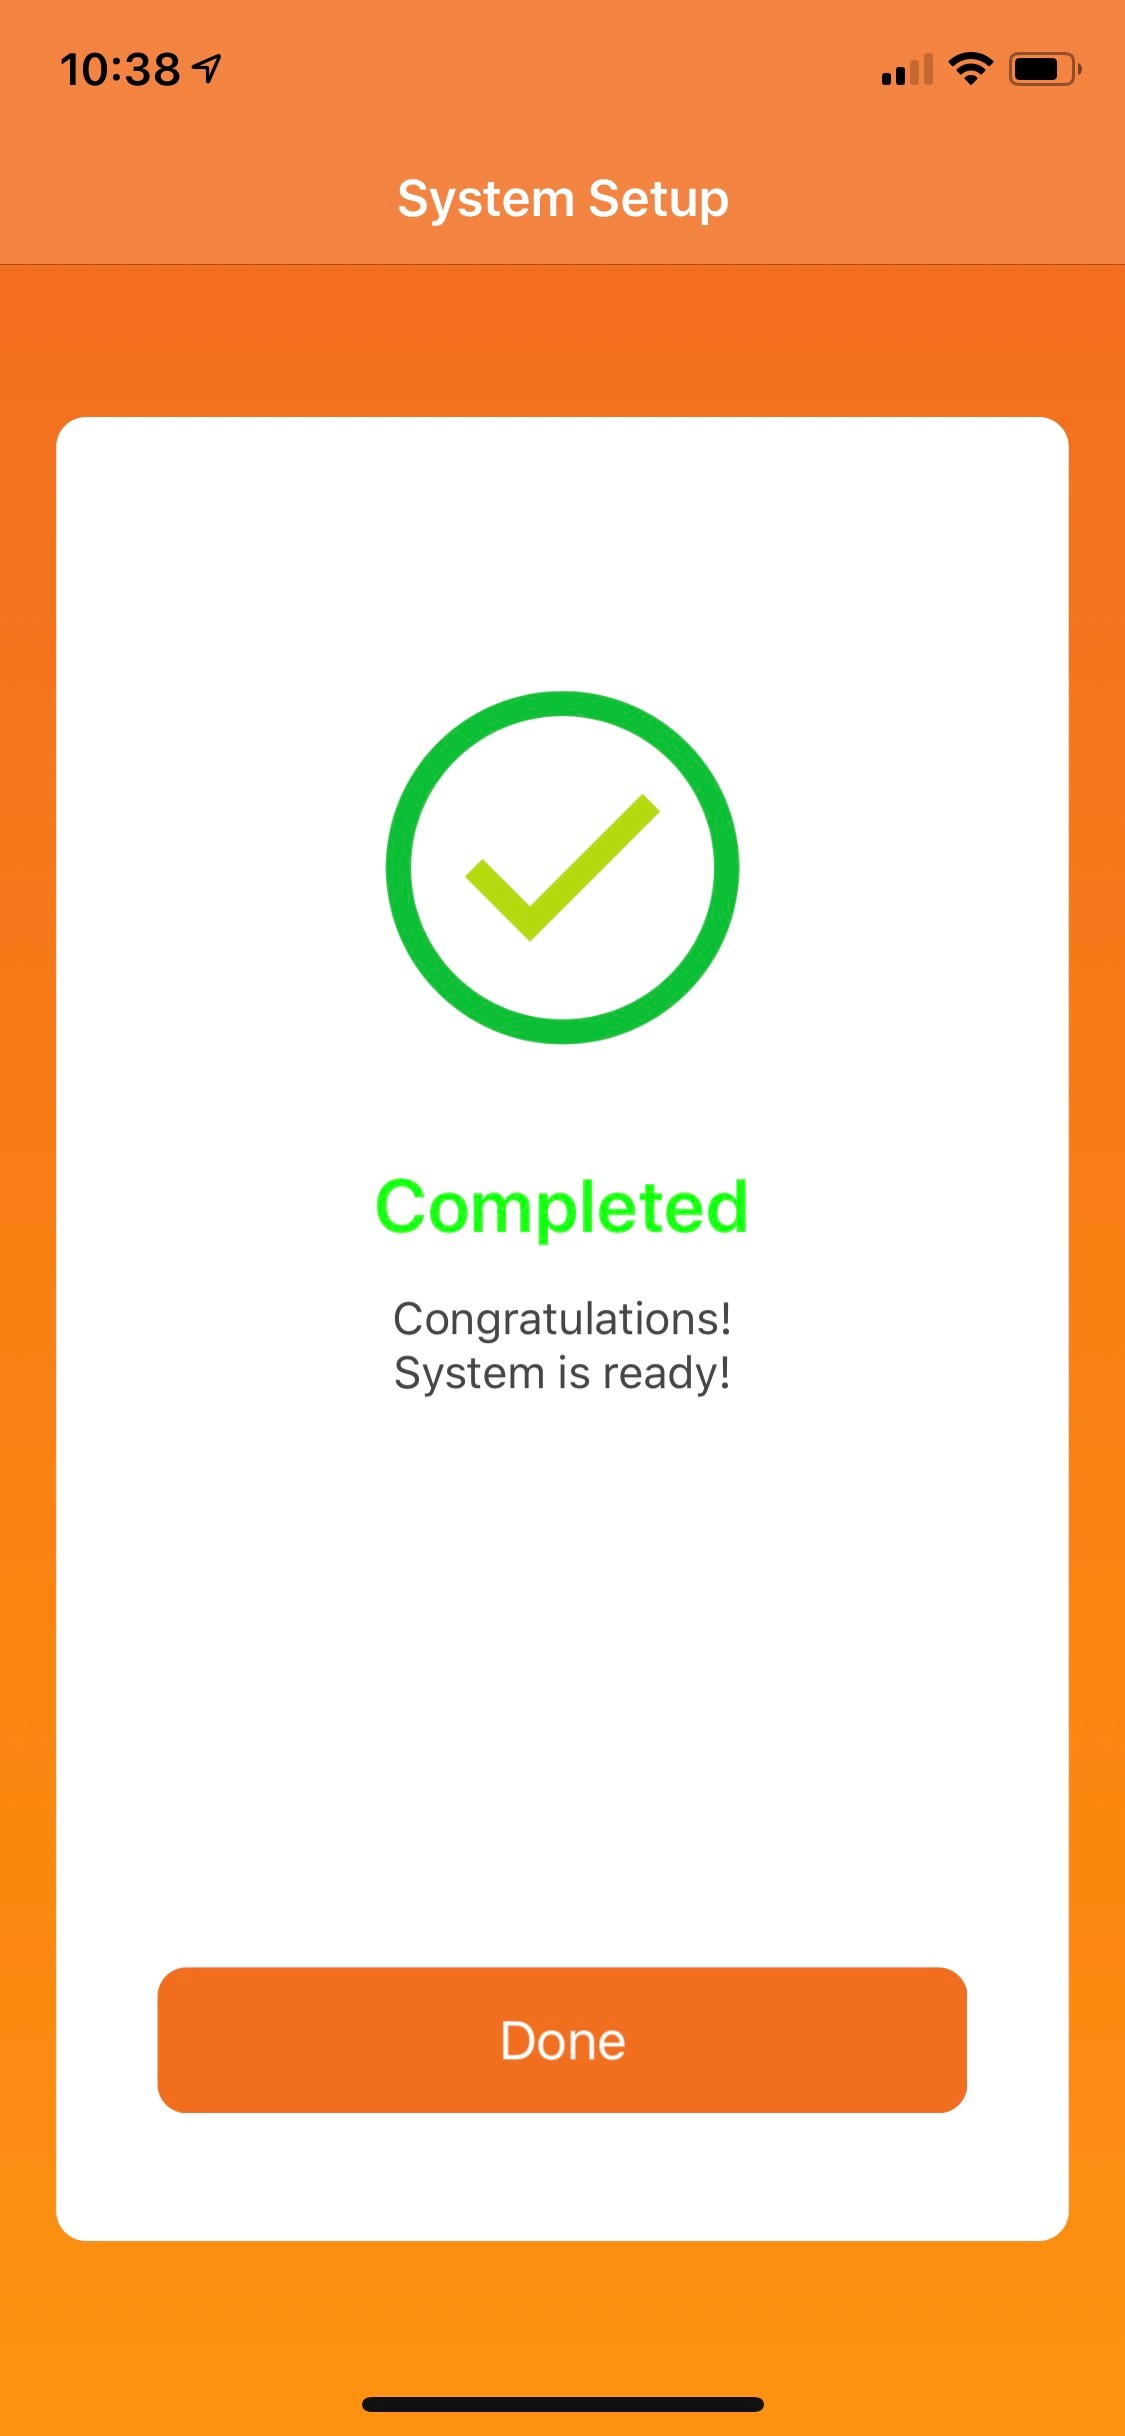
d) Once you see the screen below, you’re device setup is complete!
Note:
Systems also go by: OPU, Gateway, Security Shuttle, Security Gateway, Hub, or System. The devices on the system talk to this central hub to stay online.
To add a camera or sensor add-on
From the home screen, tap the “Sidebar Menu” icon
a) Tap “Add Device”
b) Scan the QR code and follow the setup instructions.
c) If you have multiple security gateways or locations, you may need to select where you would like to add the device as shown below.
d) Once you see the screen below, you’re device setup is complete!
Note:
If the device belongs to another Home8 system,
1. Please remove the device from the origin system first. Go to the “Device Management” page of the Home8 app. Select the device and tap remove.
2. If the system has not yet been activated, please activate the system first then remove the device or contact Home8 technical support for assistance.
3. After removing a Camera, you need to reset the camera before adding to another system.
Attention:
This reset process will restore OPU back to factory default setting. All previous settings and data will be erased.
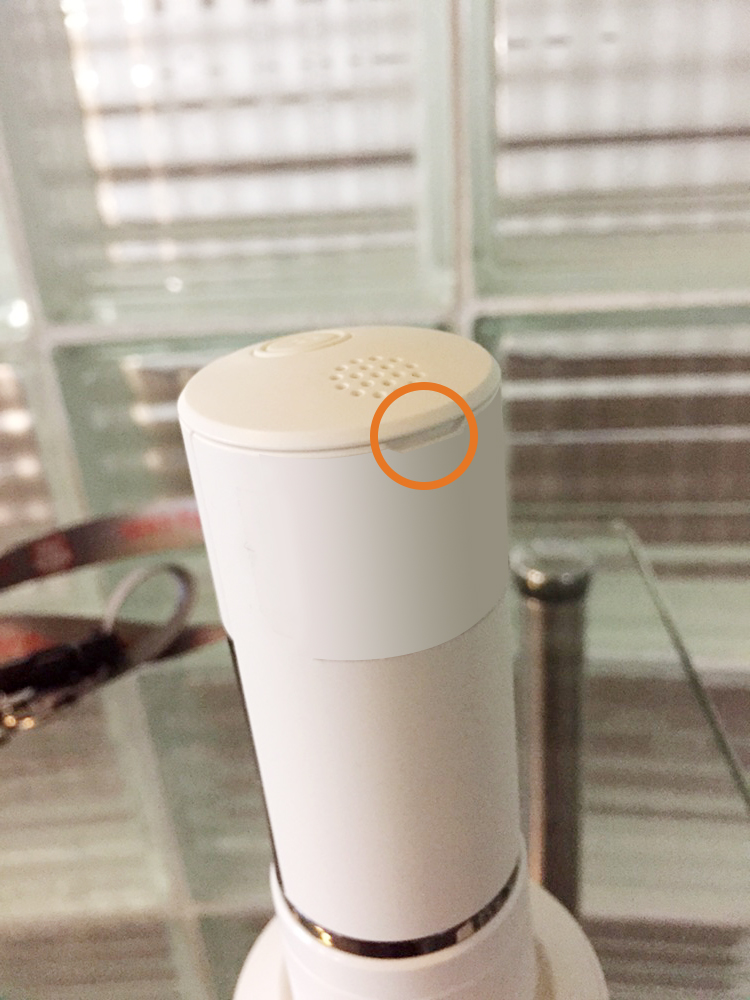
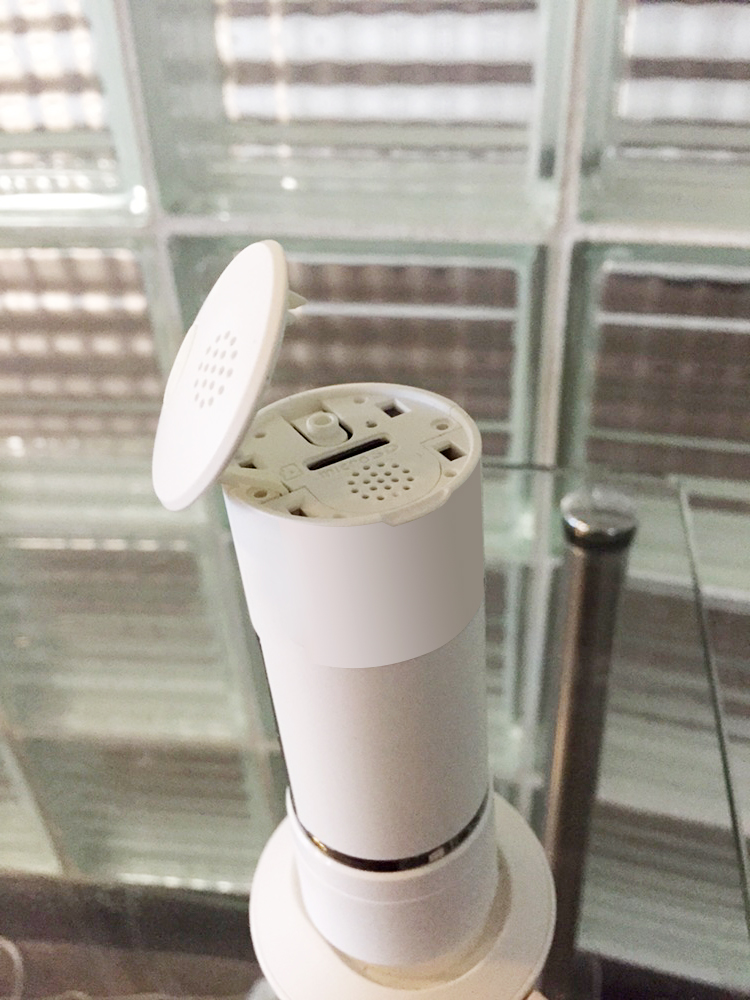
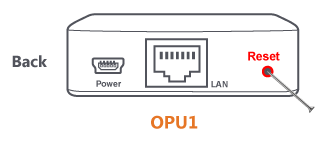
OPU/SecurityGateway1.0
- Power up your OPU and wait 1 minute
- Gently insert a paperclip into the reset hole on the back of the device for approximately 20 seconds
- The LED indicator will stop blinking for a few seconds then restart blinking
- Please wait 2-3 minutes for OPU to reconnect
- Now use App to activate your OPU
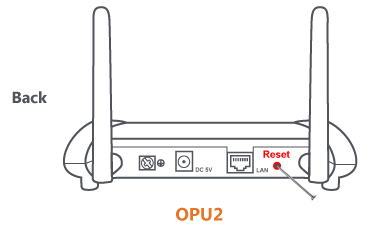
OPU2/SecurityGateway2.0
- Power up your OPU and wait 1 minute
- Gently insert a paperclip into the reset hole on the back of the device for approximately 20 seconds
- All LED lights in the front of the device will go off then the unit will start to reboot
- Please wait 2-3 minutes for OPU to reconnect
- Now use App to activate your OPU
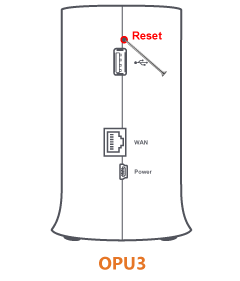
OPU3/SecurityGateway3.0
- Power up your OPU and wait 1 minute
- Gently insert a paperclip into the reset hole on the back of the device for approximately 40 seconds
- All LED lights in the front of the device will go off then the unit will start to reboot
- Please wait 2-3 minutes for OPU to reconnect
- Now use App to activate your OPU
First sign in to your mobile app,
From the home screen, tap the “Sidebar Menu” icon
Tap “Device Management”
Tap on the “name” of your System that you are looking to replace the OPU
Scroll down toward the bottom and tap on “Replace with New OPU/Shuttle”
Follow the instructions on the application
Smart Plug
- Plug the device into an AC outlet, wait for 2 minutes
- Press and hold the manual power button for approximately 20 seconds, until the power light toggles
- Let go, wait 2 minutes
- Add the device
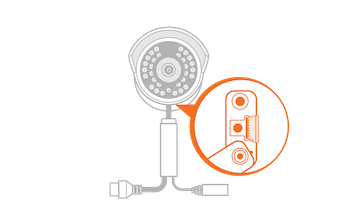
Wi-Fi Camera
- Plug the camera into an AC outlet, wait for 2 minutes
- Press and hold the reset tab in the back of the camera for approximately 5 seconds, until the power light goes off
- Let go, wait 2 minutes
- Add the device
Min Cube HD Camera
- Plug the camera into an AC outlet, wait for 2 minutes
- Insert a paperclip into the reset hole for approximately 5 seconds; hold it until the camera beeps
- Let go, wait 2 minutes
- Add the device
Twist HD Camera
- Plug the camera into an AC outlet, wait for 2 minutes
- Remove the top cover and locate the reset hole near the micro SD card slot
- Insert a paperclip into the reset hole for approximately 3 seconds; hold it until the camera beeps
- Let go, wait 2 minutes
- Add the device
OutdoorHD Camera
- Remove the AC power
- Remove the cover with the provided tool to expose the reset button
- Press and hold the reset button while you plug in the AC power
- Continue to hold for 5 seconds
- Let go, wait 2 minutes
- Add the device
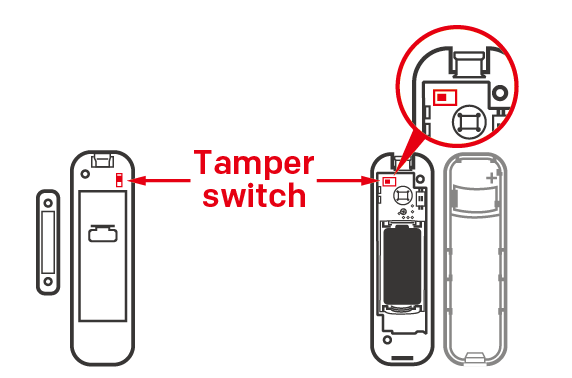
Wi-Fi 3-in-1 Trio Sensor
Instruction Video (front view)
Instruction Video (back view)
- Open the front cover of the sensor
- Remove the battery and insert again
- Press the tamper switch four times within 1.5 seconds and during the 4th press, hold the tamper switch until the LED lights up. After 3 seconds the LED will turn OFF, and after the next 2 seconds, release the tamper switch. If the reset was successful, the LED will light on for 1 second. Otherwise, the LED will flash once.
- Return to the app and follow the onscreen instructions.
Garage Door Control Button
- Press and hold down the reset button on the back of device with a pin for approximately 5-8 seconds.
- The LED indicator will blink red and green then orange to blinking green.
- Let go, wait 2 minutes
- Add the device
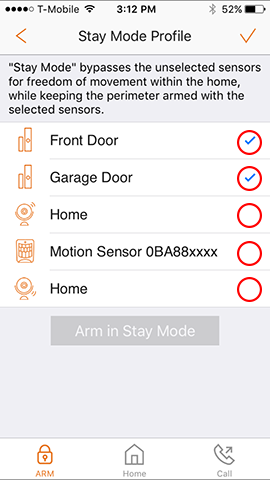
1) User taps the Arm/Disarm Button
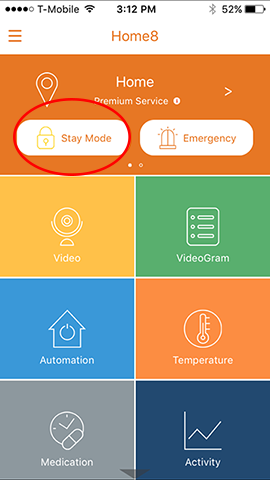
2) User taps the right arrow beside the Arm Stay mode
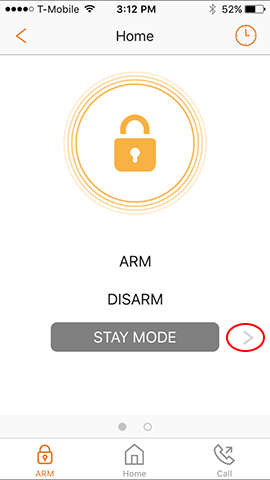
3) User selects the sensors they want active with a “∨” beside the sensor. Note: Camera is listed twice because one is for motion, the other is for sound detection. The camera with the waves pointing down and to the right is the audio trigger
When you first install the battery, the device initializes “Test Mode” that will last about one hour. After that, the device enters into “Power Saving Mode.”
This Power Saving Mode allows the Home8 Motion Sensor to achieve over 5 years of normal battery life compared to the leading competitor’s 6 months of battery life.
The system will perform normally after the 3 minute cooldown period. While in the Power Saving Mode, when a motion is detected, the red LED light blinks and the device switches into a 3 minute cooldown period. During the cooldown period, if the device continues to detect motions, the red LED light will not blink and it will reset itself.
To test if the motion sensor is working:
- Step out of view of the device
- Arm the system
- Wait at least 3 minutes
- After 3 minutes, allow the device to detect motion
- Verify if the red LED blinks and the alarm triggers
For more information, please click here
Motion sensor PIR is an optical device sensitive to sudden light change. You should always put PIR in a corner away from any sunlight but can detect human motion.
For more information, please click here
Out the box, the camera’s motion detection feature is turned off by default. From the Home Screen of the App, go into Device Management and tap on the camera in Camera List. Then tap on Motion Detection. You will notice that it is set to 0%, which is OFF. Setting it to 100% is too sensitive and will trigger many false alarms. You can test this by ensuring nothing is moving in the room and then arming the system and then waiting a little while. If you are sure nothing is moving in the room and an event gets triggered due to motion being detected by the camera, the sensitivity is too high. Lower the sensitivity and test again. Once you get no more false alarms, do a test by acting like an intruder to see if an event gets triggered. You may find that you need to increase the sensitivity as it might be not sensitive enough. You will need to test and find the correct sensitivity value for the environment. Please note that each event requires a 30 second cool-down before another event can be triggered.
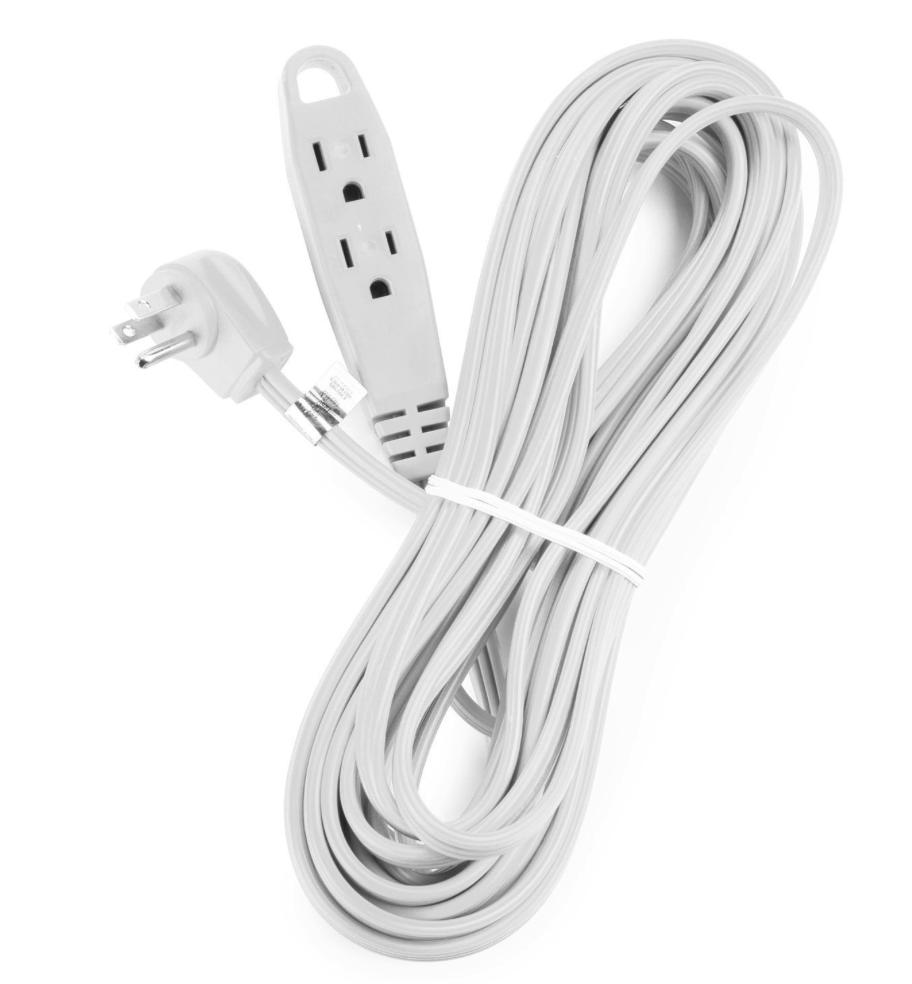
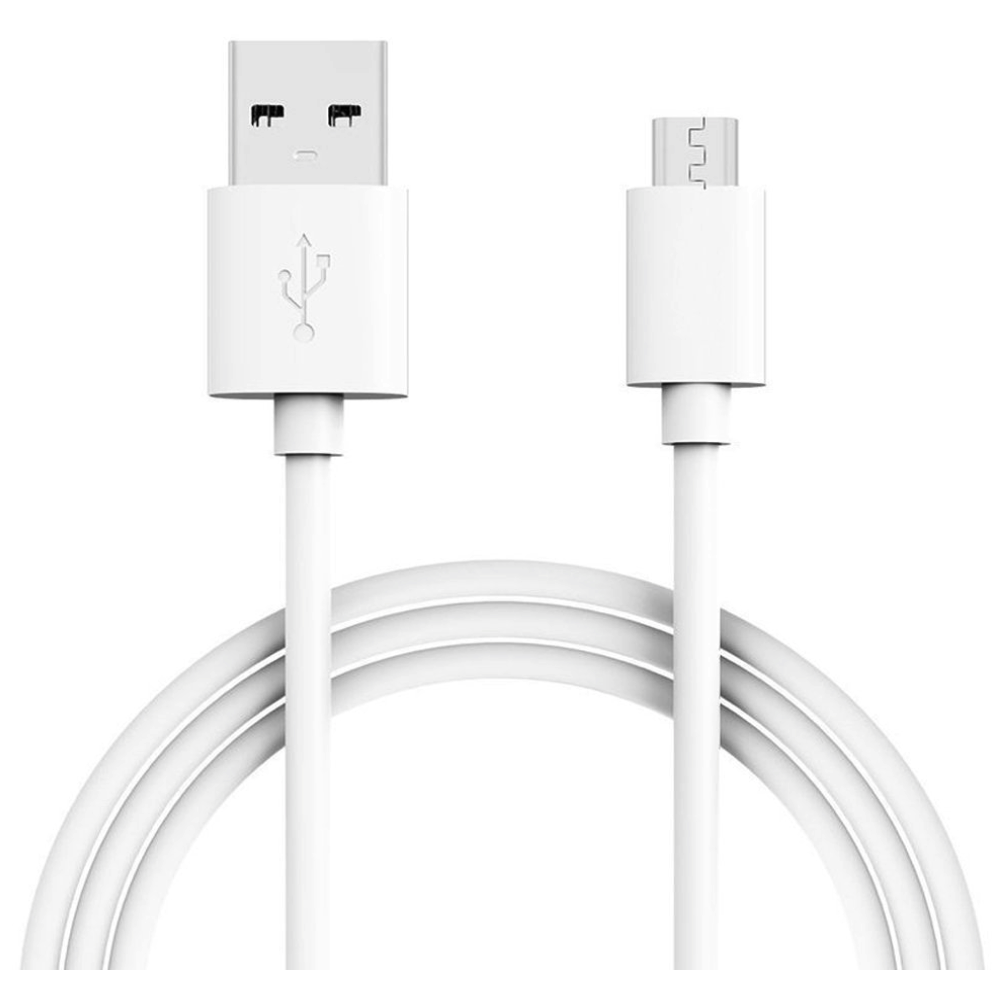
Any “Micro-USB male to USB-A male cable” will be compatible with the devices. The cable is also known as a “Micro-USB charging cable”. You can choose cables of 10ft to 15ft. If the required length is longer than 15ft, it is recommended that a 110V extension cord be used and extended from the wall outlet.
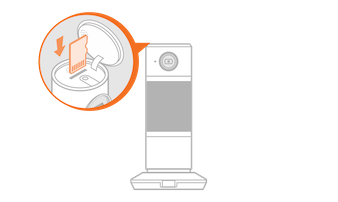
To save video clips locally or turn on the continuous recording function, a MicroSD card is required.
The MicroSD card should be SDHC format which can range from 2GB to 32GB.
Please insert the MicroSD card into the camera when it is powered off to avoid damage to the MicroSD card.
Twist Camera
Remove the top cover to locate the card slot.
Mini Cube Camera
The card slot is on the right side of the camera.

Mini Outdoor Camera
Use the wrench to open the cover which is located on the bottom of the camera.
Yes! If there is something you would like to keep longer than 7 days you can copy the video to your PC.
# of Doors:
Make:
Model:
You need to make selections first
Home8’s partnership with IFTTT, “If this, then that,” can improve your home automated experience and make life easier. IFTTT links together different internet-connected devices and services, consisting of a trigger and an action, to automate tasks that would otherwise be repetitive or tedious. These trigger-action combinations are called “recipes,” where an event in one device or service automatically triggers an action in another. For example, avoid letting your Wink Pivot outlet short circuit during a water leak by having it turn off automatically when Home8 detects a leak. To view our setup instructions click here.
Please click here to go to our Ecosystem integration instructions.
Virtual Gateway is a configuration method of selected Home8 devices without the need of a physical Home8 shuttle/gateway. This function is available for free. All that is needed is our Home8 app and at least one of our supported hub-less devices, which includes the Twist HD Camera, Mini Cube HD Camera, Wi-Fi Camera, Mini Outdoor Full HD Camera and Garage Door Opener Relay. Click here to learn more.
Care24 is a free companion mobile app for caregivers to use with their loved-ones or patients to cover both indoor and outdoor care. The app utilizes the user’s smartphone as a fall detector, panic button and GPS locator.
Networking
Please try restarting the Camera by going to the Home8 app, > Device Management > Camera > Restart Camera. If the camera remains offline, please try repowering the camera by unplugging its power source for 10 seconds, and then plugging the camera back in.
If the camera is still offline after 2 minutes, bring the camera closer to the Shuttle and wait 2 minutes. If the camera comes back online, it is possible that the Wi-Fi signal between the camera and Shuttle is too weak. In this case, you can add an additional nearby Wi-Fi router network to the Camera that has a stronger signal to improve Camera connection. You can do this by going to the Home8 app > Device Management > Camera > Wi-Fi > Choose a Wi-Fi Network with a strong signal, and then enter the Wi-Fi Password. Please make sure that the new network connection established for the camera is in the same network as the Shuttle.
If it still does not come back online, Home8 technical support would be happy to provide further assistance.
When one of your device shows offline under [Device Management], please try restarting the device by repowering the device. First unplug its power source for 10 seconds, and then plug the device back in.
If the device is still offline, please bring the device closer to the shuttle/gateway and wait 2 minutes. If the device comes back online, the device may be out of range, and then we would suggest rearranging the placement of your gateway to give a stronger signal to your devices. You can also purchase our “Wi-Fi Range Extender” or “RF Extender” to extend the range of devices connected to your Home8 gateway.
Verify if the Shuttle is connected to your router and if your router has internet. During internet outages, once the internet comes back, the Shuttle will come back online automatically. If the Shuttle remains offline after the internet is recovered, please repower the Shuttle by unplugging its power source for 10 seconds, and then plugging it in again. If the Shuttle does not come back online within 3 minutes, please try to reboot your ISP modem or router and wait for the Shuttle to come back online.
If it still does not come back online, Home8 technical support would be happy to provide further assistance.
System & Service Security
Our security system is designed so that there is no delay from the sensors being triggered and the siren going off. Upon the sensors being triggered, both the Owner and the Authorized Users will receive push-notifications on their smartphones. The Owner will also receive an email with 1 attached snapshot taken by each camera. Each camera records a 15 second video-gram recording of the event, viewable by the Owner and Authorized Users*. The video-grams are listed in the details for the event. Upon verification of the event, both Owner and Authorized Users can disarm the system to cancel the siren. If there is no response to the event, each Emergency Contact will receive 1 text message alert 5 minutes after event being triggered*.
*Viewing of the 15 second video-gram on a Smartphone is part of the premium service upgrade. The text messaging to the Emergency Contact is also part of the premium service upgrade.
Our security system is designed so that there is no delay from the sensors being triggered and the siren going off. Upon the sensors being triggered, both the Owner and the Authorized Users will receive push notifications on their smartphones. The Owner will also receive an email with 1 attached snapshot taken by each camera. Each camera records a 15-second video-gram recording of the event, viewable by the Owner and Authorized Users*. The video-grams are listed in the details for the event. Upon verification of the event, both Owner and Authorized Users can disarm the system to cancel the siren. If there is no response to the event, each Emergency Contact will receive 1 text message alert 5 minutes after the event being triggered*.
*Viewing of the 15-second video-gram on a Smartphone is part of the premium service upgrade. The text messaging to the Emergency Contact is also part of the premium service upgrade.
Alarm Notification Management
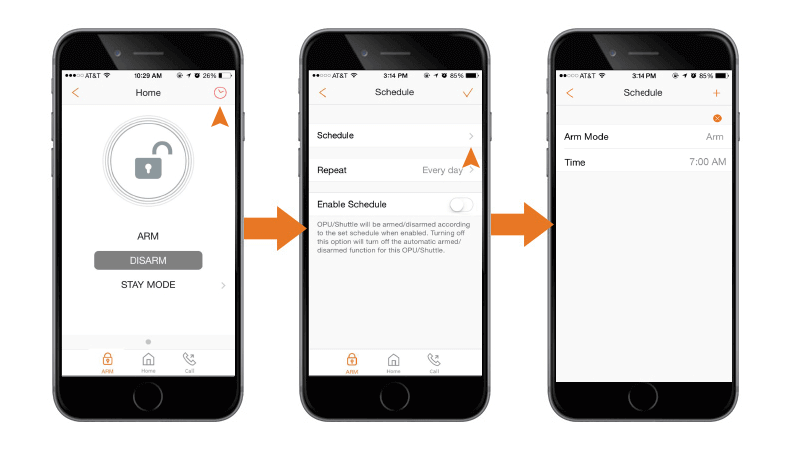
VSelect the clock icon at the top right corner on the Arm page. The prompts thereafter are highly intuitive; select which arm modes you want at the times you want, and which days you would like to repeat this schedule. Scheduled arming will follow regular arm behavior and notifications.
Each system owner will receive Event Snapshot emails when cameras are installed. Owners must first verify their email addresses before the emails are sent. To verify, please follow the steps below. When your email address has been verified, please make sure the “Event’s Email” is subscribed under “My Profile”.
To set up, please follow the steps below.
From the home screen, tap the “Sidebar Menu” icon
-Tap “My Profile”
-Tap “Email”
-Follow the instructions on the application to verify your email address
-Look for the verification email in your inbox or spam folder and click the link in that email to verify
From the home screen, tap the “Sidebar Menu” icon
Tap “Notifications”
Ensure “Push Notification” is “ON”. Ensure “Audio alerts on mobile” is “ON”.
Then check the smartphone volume control, including the mute button.
On Android devices, verify the sound status in settings, sound, volumes, Music, video, games, and other media.
Turning on app notification with Android devices: Settings, Application Manager, Home8, tap check show notifications box.
On iOS devices, verify the sound status in settings, sounds, Ringer and Alerts.
Turning on app notification with iOS devices: Settings, Notification Center, Home8, alert style not set to none, Sounds = “On”, Show in Notification Center = “On”, Show in Lock Screen = “On”
Subscription
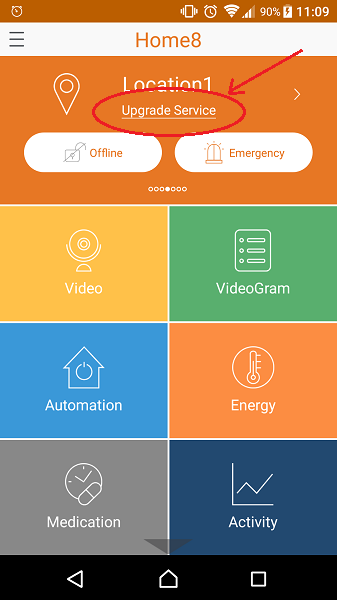
Please click here to subscribe using our online web portal.
Or you can also log in to your account on your smartphone app, and click on the “Upgrade Service” on the home page.
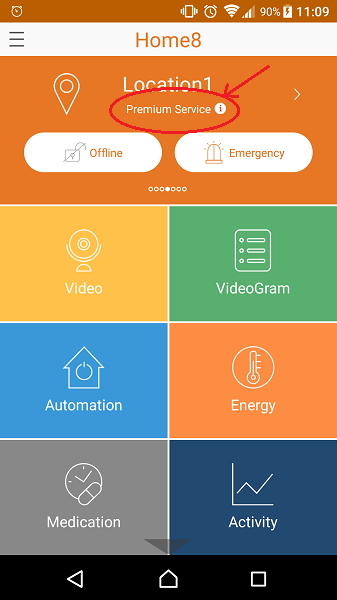
The system owner can do so by logging into the Home8 web portal or by clicking “Premium Service” on the App. Go to the Systems/Services tab. Click on “Details” next to the System. Then click on “Update Payment Method” to update the credit card details.
Miscellaneous
Yes! Please learn about our referral program here.
To obtain a copy of a System Certificate, the system owner must sign into their Home8 portal at https://store.home8alarm.com/index.php?route=account/login, go to the “Systems/Services” tab, click on “System Certificate” under the “Action” column and follow the prompt; now the certificate will be emailed to you.
Please feel free to reference our Home8 App User Manual (PDF). You can contact Home8 Support at 1-844-800-6482, Mon – Fri: 9am – 5pm PST to speak with one of our technical support specialists. You may also choose to Live Chat us from our website during business hours or email us anytime. Please leave us a detailed message and we will be promptly respond within one to two business days.